SD Card
Written by Grace Lo & Alina Wang
Interfacing with an SD card was developed and tested on the Adafruit MicroSD card breakout board. It communicates over SPI to log sensor data and the associated date/time at a user-defined frequency into a .csv file format. The interface to the card is handled by a FatFs library adapted for SD cards from carlk3. The basic card functionality, including mounting the drive, opening/closing files, and read/write data is borrowed from Bruce Land. The command line interface is borrowed from tinyUSB examples to test the SD card functions. The SD card is completely handled by FatFs.
Pin Connections
Breadboarding best practices should be followed. Use the shortest possible wires for maximum clock speed, which when using solderless protoboards is capped at ~20MHz due to pin capacitance.
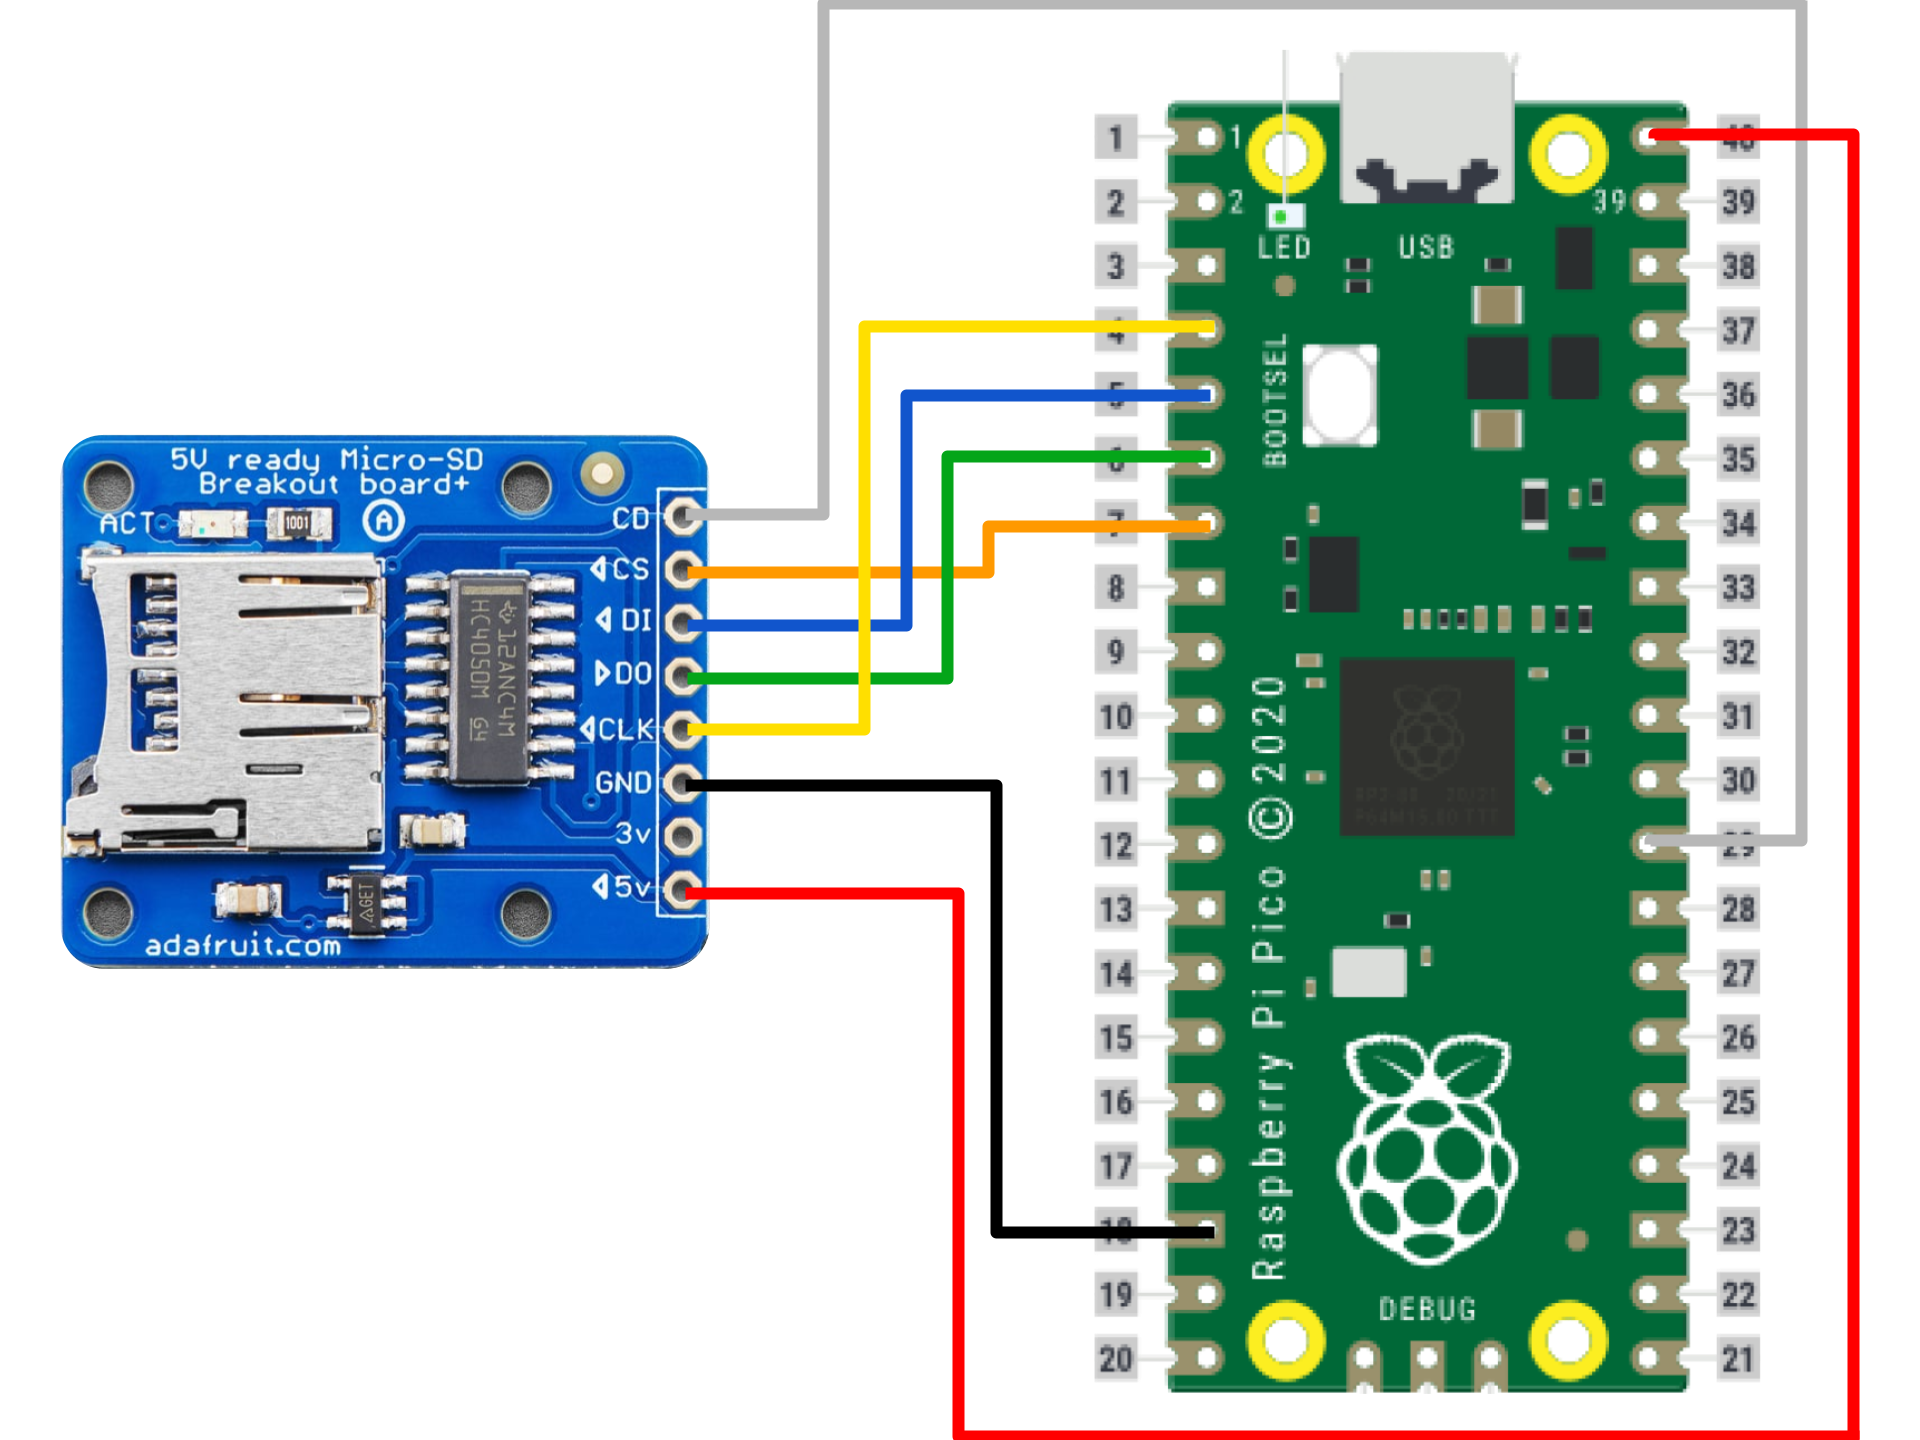
Pin connections from the microSD breakout → Pico are as follows:
- VIN (5V) → VBUS (pin 40)
- GND → GND
- CLK → SPI0_SCK (gpio 2)
- DO → SPI0_RX (gpio 4)
- DI → SPI0_TX (gpio 3)
- CS → SPI0_CSn (gpio 5)
- CD → gpio 22
hw_config.c provides the ability to remap the SPI channel and the gpio pins connected to the SPI channel.
Code
All code is in the CornellFluxChamber Github repository. The code for interfacing with the SD card is incorporated into flux_chamber.c. It is important to note that the SD card only works reliably when its corresponding code is placed on core 1 of the dual-core Pico processor. We hypothesize that manually starting core 1 in the main() function provides sufficient time for the SD card to start up in a way that cannot be replicated by time delays.
Includes
The first lines of code in the C source file include header files. Don't forget to link these in the CMakeLists.txt file!
The following files are required to interface with the SD card, including the FatFs library adapted for SD cards.
#include <stdio.h>
#include <string.h>
#include "pico/stdlib.h"
#include "sd_card.h"
#include "ff.h"
Initializations
The SD card is initialized and the filesystem is mounted using functions provided by the FatFs library.
// Initialize SD card
if (!sd_init_driver())
{
    printf("ERROR: Could not initialize SD card\r\n");
    while (true);
}

// Mount drive
fr = f_mount(&fs, "0:", 1);
if (fr != FR_OK)
{
    printf("ERROR: Could not mount filesystem (%d)\r\n", fr);
    while (true);
}
Interfacing with the SD Card
The FatFs library provides many filesystem functions, but only the ones used in this project will be described below.
Write to a file: Open the file and if the file "filename" does not exist, a new file is created. But if the file already exists, the new content will be appended to the bottom of the file. Synchronize cached information by writing to the SD card periodically to avoid data loss. All open files must be closed.
f_open(&file_struct, "filename", FA_WRITE | FA_OPEN_APPEND)
f_write(&file_struct, "contents", strlen("contents"), &wr_count)
f_sync(&file_struct)
f_close(&file_struct)
Read from a file: Open the file with read access, then read the contents. All open files must be closed.
f_open(&file_struct, "filename", FA_READ)
f_read(&file_struct, buffer, sizeof(buffer), &count)
f_close(&file_struct)
Remove file/directory:
f_unlink(path)
List files in a directory: Open the directory and get the full path of the current working directory. Then read an item of the directory (this last command is looped until all items are read).
f_opendir(&directory_struct, directory_name)
f_getcwd(path, sizeof(path))
f_readdir(&directory_struct, &file_info_struct)
Navigate to a different directory:
f_chdir(path)
Make a new directory:
f_mkdir(path)
An example of initalizing, mounting, and interfacing with the SD card is provided below:

Debugging Tips
At present, both flux_chamber.c and terminal_interface.c can reliably initalize, mount, and interface with the SD card. However during the development phase, many errors arose particularly due to the SD card. Should these problems reappear, here are a few debugging tips that worked for us.
Check that all devices are grounded! Yes, this includes your laptop being grounded through its charging cord. For any errors initializing the SD card and filesystem, first try power cycling to reset the system - on the order of 20 times. Other general debug tips include checking all circuit connections are secure and reflashing the RP2040. If the error persists, some other solutions are outlined below:
ERROR: Could not initialize SD card
May need to reformat the SD card (to FAT32) in the case that it has been corrupted.
ERROR: Could not mount filesystem
Interestingly enough, connecting UART0_TX (gpio 0) and GND to the oscilloscope solves the problem.
Read timeout or Single Block Write failed
Before power cycling, try reentering the command multiple times. There seems to be occasional delays during file read/write that resolve on their own after a bit of time.
Cannot create '<filename>.csv'
Remove the existing file under the same name. If the error persists, it is indicative of a corrupted file. Corrupted files usually resolve themselves after power cycling or giving a bit of time, so for the time being, it may be easier to create a new file (under a new filename).